I’ve made a small taskbar app, that can change the channels on my tv 🙂
It includes a small tv-guide for the first 9 channels.
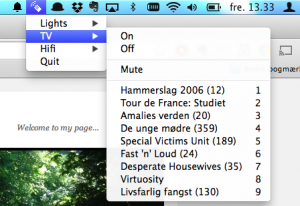
It calls a webpage on the Raspberry Pi, which then sends the IR signal to the tv.
I’ve made a small taskbar app, that can change the channels on my tv 🙂
It includes a small tv-guide for the first 9 channels.
It calls a webpage on the Raspberry Pi, which then sends the IR signal to the tv.
So I have one of these cheap remote controlled outlets, and I just finished my IR remote control project with the Raspberry Pi, so why not try to control these with the Raspberry Pi also?

The way these outlets work, is you set some dip-switches on the remote, and on the outlets so they match.


Source: http://shop.ninjablocks.com/blogs/how-to/7506204-adding-433-to-your-raspberry-pi
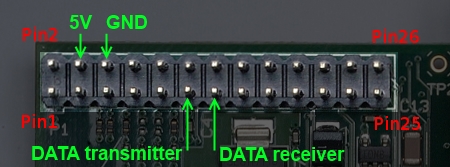
I bought my RF transmitter and receiver from eBay a about 1$.
Connecting RF transmitter and receiver to the Raspberry Pi is pretty simple.
Both the reciver and transmitter has a VCC, GND and DATA pins.
And all you do is connect it to the Raspberry Pi GPIO pins.
Source: https://github.com/ninjablocks/433Utils/tree/master/RPi_utils
Start by installing RPI_utils
sudo apt-get update

#Installs GIT
sudo apt-get install git
sudo apt-get install git-core

#Installs 433util
git clone git://github.com/ninjablocks/433Utils.git
cd 433Utils/RPi_utils/

#Installs wiringPI
git clone git://git.drogon.net/wiringPi
cd wiringPi
git pull origin
./build

#Builds RPI_util
cd ..
make all
To capture and decode the RF signal from the remote, I ran the program RFSniffer.
sudo ./RFSniffer
When I push the A (on) button on the remote, I get the following code on the screen.
Received 5260625
Received 5260625
Received 5260625
Received 5260625
Received 5260625
To test if the transmitter works you can send the received value with this command.
sudo ./codesend 5260625
If you convert 5260625 to binary, you get 10100000100010101010001.
And looking at the binary value of all the buttons, you start to see a pattern.
| Button | Decimal value | Binary value |
| A (On) | 5260625 | 10100000100010101010001 |
| A (Off) | 5260628 | 10100000100010101010100 |
| B (On) | 5263697 | 10100000101000101010001 |
| B (Off) | 5263700 | 10100000101000101010100 |
| C (On) | 5264465 | 10100000101010001010001 |
| C (Off) | 5264468 | 10100000101010001010100 |
| D (On) | 5264657 | 10100000101010100010001 |
| D (Off) | 5264660 | 10100000101010100010100 |
They all starts with 1010000010, and all the ON buttons ends with 0001 and all the OFF buttons ends with 0100.
The 1010000010 matches with the dip-switches; 10 = down and 01 = up.
The middle part, is a value that identifies A,B,C and D.
You can see the pattern here:
| Dip switch | Button Id | On / Off | ||||
| A | = | 10 10 00 00 10 | + | 00 10 10 10 1 | + | 0001 / 0100 |
| B | = | 10 10 00 00 10 | + | 10 00 10 10 1 | + | 0001 / 0100 |
| C | = | 10 10 00 00 10 | + | 10 10 00 10 1 | + | 0001 / 0100 |
| D | = | 10 10 00 00 10 | + | 10 10 10 00 1 | + | 0001 / 0100 |
I then created the following bash script.
#!/bin/bash
BTN=$1
STATUS=$2

BTN=$(echo $BTN | tr '[:lower:]' '[:upper:]')
STATUS=$(echo $STATUS | tr '[:lower:]' '[:upper:]')

DIP_SWITCH="DDUUD"  #Change dip switches to match the remote

#hardcoded values
BTN_A="001010101"
BTN_B="100010101"
BTN_C="101000101"
BTN_D="101010001"

DIP_SWITCH=$(echo $DIP_SWITCH | sed 's/D/10/g' | sed 's/U/00/g')

case $BTN in
    A )
        BTN=$BTN_A ;;
    B )
        BTN=$BTN_B ;;
    C )
        BTN=$BTN_C ;;
    D )
        BTN=$BTN_D ;;
    * )
        echo "Please define the button [A-D]";exit;
esac
case $STATUS in
    ON )
        STATUS="0001" ;;
    OFF )
        STATUS="0100" ;;
    * )
        echo "Please define the button state [ON/OFF]";exit;
esac

BIN=$(echo $DIP_SWITCH$BTN$STATUS)
DEC=$((2#$BIN))

#echo $DEC
sudo /home/pi/codesend $DEC
And to emulate a click, I just call
./RFISend.sh A ON
Because the codesend uses wiringpi, it is required to call with sudo.
But if you need to call it from a webserver, it creates some problem, because sudo requires a password.
So we need to edit visudo, so it doesn’t require a password.
(it may not be a secure thing to do, but in my case the webserver is not exposed to the internet, and is only for “at home” use)
sudo visudo
Add the following line to the file.
#NOTE: use TAB and not space, except for the last one – after NOPASSWD:
www-data ALL=(root) NOPASSWD: /home/pi/433Utils/RPi_utils/codesend
Save the file and reboot the Raspberry Pi, and you’re good to go.
Now the local PHP webserver can call the script with:
<?php
  shell_exec("/home/pi/433Utils/RPi_utils/RFISend.sh A ON");
?>
I wanted to use the Raspberry Pi as a remote control for my TV, so I searched the internet and found a pretty good guide by Alex Bain.
So all credits goes to him!
I then created a TV-guide webapp, where I could click on a channel to switch to that channel on the TV.
It’s webbased but I haven’t exposed it to the internet, so it only works when I’m home 🙂


(Ignore the circuit connected with the green and red wire, its a RF tranmitter, which I will post about later)
I had a old spare 1GB SD card laying around, so first thing I did was install Moebius which is a very small Raspberry Pi distro, that fits the 1GB nicely 🙂
I don’t know what class the card is, but I don’t think it really matter, as performance is not a issue here.
To install the image to a SD-card, I followed the guide from RPi Easy SD Card Setup. (I used the program Pi-Writer.)
I made the electronic from Alex’ schematic, and soldered the components on a stripboard.
I bought my parts from my local electronics store:
2 x IR-LED
2 x LED holder
1 x IR receiver
1 x NPN transistor
1 x 10 kΩ resistor
1 x 2×13 pin connector
1 x stripboard
Follow the guide here.
Just for good measure reboot the Raspberry Pi
sudo reboot
When it’s back up and running, we now install the webserver and PHP
sudo apt-get -y install lighttpd
sudo apt-get -y install php5-common php5-cgi php5

#enable fastcgi module included with lighttpd
sudo lighttpd-enable-mod fastcgi fastcgi-php

#The following restarts the webserver
sudo service lighttpd force-reload
Now we need to setup some permissions for the webserver.
#change the owner of /var/www to www-data (user and group)
sudo chown www-data:www-data /var/www

#gives user and group read/write/execute rights to /var/www
sudo chmod 775 /var/www

#adds the user pi to the group www-data
sudo usermod -a -G www-data pi