After a long break from blogging, I finally have a project worth sharing.
For the last few Halloweens, I’ve been projecting spooky videos onto my front door. The setup worked reasonably well, but aligning the projection was always a manual process. Every year I would spend time moving the projector, adjusting angles, and tweaking the image to get it to roughly fit the shape of the door.
It never quite lined up perfectly.
At the same time, I wanted to make the experience more interactive. Instead of just looping a video all evening, I wanted a jump-scare effect that could be triggered on demand when visitors approached the house.
Since I already run Home Assistant and have motion sensors and Zigbee buttons installed around the house, it felt natural to integrate those into the setup as well.
That combination of requirements led me to build my own projection mapping tool.
The goals were simple:
- Make it easy to align videos to the front door.
- Play a looping background video.
- Trigger jump-scare videos manually or automatically.
- Integrate with Home Assistant motion sensors and Zigbee buttons.
- Run entirely in a browser without additional software.
The result is a browser-based projection mapping application that allows videos to be warped and aligned to almost any rectangular surface using an adjustable four-corner mapping grid.
The project is available on GitHub:
Why a Browser?
I wanted something lightweight that could run on almost any machine without installation.
The entire application is written using:
- HTML
- CSS
- JavaScript
- WebGL
There is no backend, database, or build process. Running the application is as simple as starting a local web server and opening a browser.
One browser window acts as the control panel, while a second window runs fullscreen on the projector output.
Controller and output communicate directly through the browser using BroadcastChannel, and all settings are stored locally using localStorage.
Projection Mapping
The core feature is perspective correction.
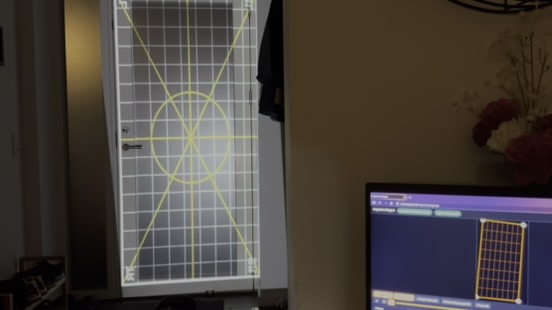
With the projection mapping tool, alignment becomes much easier. Instead of moving the projector around, I can simply drag four corner points until the projected image matches the physical surface. The mapping is saved automatically, making future setup much faster.
The mapping itself is rendered using WebGL, allowing the video to be warped to fit the target surface while maintaining smooth playback.
A built-in test pattern helps with calibration before switching to video playback.
Interactive Video Playback
The application supports two different video types:
Main Video
The main video can either loop continuously or remain idle until triggered by a sensor.
Trigger Video
A separate trigger video can be launched manually or automatically.
This makes it possible to create jump scares on demand.
Home Assistant Integration
Previously, the projection would simply run in a loop throughout the evening. This worked, but it meant the effect was often missed, and the jump scares quickly became predictable.
Since I already use Home Assistant for much of my home automation, I decided to integrate the projection system directly with it, so I could reuse some of my sensors and buttons.
The application connects to Home Assistant through its WebSocket API and can react to sensor events in real time.
This makes it possible to:
- Trigger jump-scare videos with a zigbee button when someone knocks on the door.
- Keep the projection idle until visitors arrive, and only play when someone comes close to the house.
Disclosure
One thing worth mentioning is how this project was built.
Large parts of the code were developed with the assistance of AI tools.